Bring Stripe Checkout to life in your app with a clean, test-mode subscription flow. This guide walks through keys, edge functions, pricing cards, and Supabase verification—so you can go from a landing page click to a successful redirect and stored subscription data. Clear steps. Real debugging. No fluff.
How to set up Stripe Checkout quickly?
Start with the essentials and wire them into your existing pricing UI. The goal: a working payment flow from the landing page.
- Create a Stripe test account. Get your publishable key and the secret key. Use the secret key to connect your app.
- Install any required dependencies.
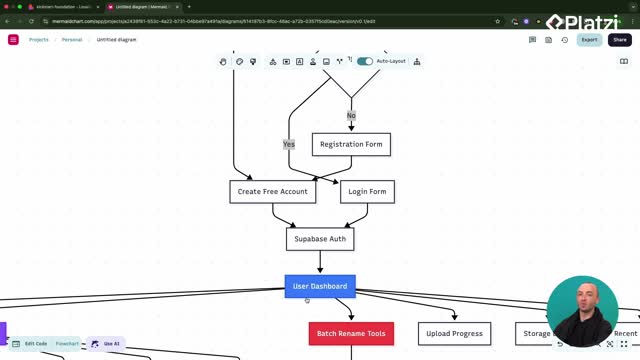
- Create a subscriptions table in Supabase: track user subscription status, plan type, and Stripe customer ID.
- Update user profiles: add a subscriptions field for quick access.
- Add RLS policies: keep subscription data secure.
- Build edge functions: create checkout, check subscription, and a customer portal.
- Integrate Stripe Checkout with your landing page pricing cards: trigger create checkout from those buttons.
- Provide the Stripe secret key to the builder so it can connect and configure.
Tip: Google login and Stripe may not load inside a preview. Open the app directly, sign in, then test the flow.
What fixes the checkout error and links product and price IDs?
If “failed to create the checkout session” appears, it often means the Stripe product and price aren’t wired up in your edge function.
- Click the pricing CTA and watch the console: inspect and review logs.
- If the edge function errors, connect your Stripe product ID and price ID.
- Find product ID in Stripe under the plan (for example, Basic Plan).
- Find price ID inside the subscription price details.
- Replace placeholders in code (for example, the “replace with your Stripe price ID” comment).
- Update the plan price to the intended amount (for example, 20 bucks a month).
- Refresh and try again: the Stripe-hosted page should open.
- Use Stripe test details from the docs, then subscribe and confirm the redirect back to your dashboard.
Result: the plan appears correctly on the hosted checkout, payment completes in test mode, and you return to your app.
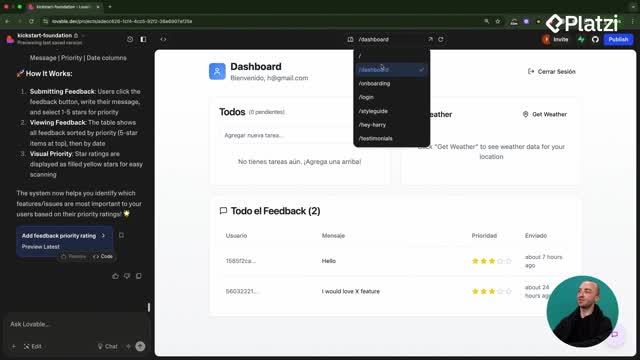
How to verify subscription data in Supabase securely?
After subscribing, confirm that your database reflects the new state. Security and accuracy matter.
- Open Supabase: check the subscriptions table.
- Verify user ID, email, Stripe customer ID, current subscription status, and the subscription tier.
- Note that the check subscription edge function updates the “currently subscribed” flag on login.
- Keep RLS policies in place so only the right users can read their data.
- A customer portal exists for later management; it’s mentioned but configured in a future step.
Which keywords and phrases should you know?
- Stripe Checkout: hosted payment page triggered from pricing cards.
- Stripe secret key and publishable key: copied from the Stripe dashboard to connect your account.
- Subscriptions table: tracks status, plan type, and customer ID in Supabase.
- RLS policies: rules to secure row-level access.
- Edge function: server-side function like create checkout or check subscription.
- Product ID and price ID: identifiers you copy into your code to connect the plan.
- Customer portal: a place for users to manage subscriptions, set up later.
- Preview link: may not fully support Google login or Stripe flows.
- Redirected back to the dashboard: success signal after test checkout.
What skills and concepts are practiced?
- Setting Stripe test keys and connecting them to the app.
- Designing a subscriptions table and updating user profiles.
- Implementing RLS policies for secure access.
- Building edge functions: create checkout and check subscription.
- Wiring landing page pricing cards to trigger checkout.
- Debugging with browser console and fixing edge function errors.
- Mapping Stripe product and price IDs to code.
- Verifying subscription records in Supabase after payment.
- Handling redirects and confirming success states.
Got questions or hit a different error state? Share your scenario and what you saw in the console—happy to help troubleshoot.