PRIMERO DECLARAMOS LA ESTRUCTURA EN HTML:
HTML(index.html):
<<!DOCTYPE html>
<html lang=“es”>
<head>
<meta charset=“UTF-8”>
<meta name=“viewport” content=“width=device-width, initial-scale=1.0”>
<title>MAFESYS</title>
<link rel=“icon” href=“MULTIMEDIA/IMAGENES/LOGOS/MAFESYS1.ico”>
<link rel=“stylesheet” href=“CSS/estilos.css”>
</head>
<body>
<section>
<div class=“tarjeta”>
<img src=“MULTIMEDIA/IMAGENES/PAISAJES/LAGUNA.jpg” alt=“paisaje”>
<img src=“MULTIMEDIA/IMAGENES/FOTOS/MICHAEL.jpg” alt=“foto”>
<p>Christian Huamán</p>
<p>FRONT-END DEVELOPER</p>
<p ><span>Perú</span></p>
<p><span>Send e-mail</span></p>
<div class=“block1”>
<p>9,500</p>
<p>Followers</p>
</div>
<div class=“block2”>
<p>1,500</p>
<p>Following</p>
</div>
<button type=“button”><a href=“https://facebook.com/christian.michael.hc”>Follow</a></button>
</div>
</section>
</body>
</html>>
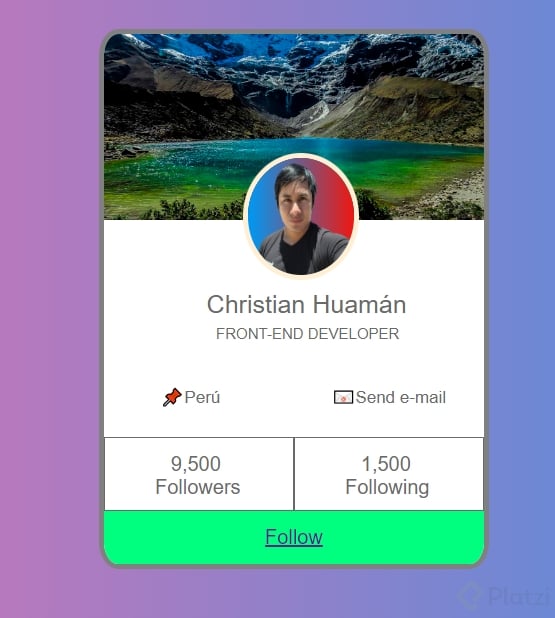
En este código en HTML tenemos imágenes de una dirección obtenidas personalmente, ustedes pueden obtener el link de sus imagenes guardadas o de algún sitio web. Podemos observar en el código que tenemos etiquetas como section con un div de clase tarjeta que es nuestra base del esqueleto dentro de ahí tenemos el codigo de las imagenes y los textos. con algunos div guardados como bloque. Aplicando el codigo de CSS es que le damos una forma de manera amigable. Le adjunto el codigo en
CSS (estilos.css):
html {
font-size: 62.5%;
}
body {
background: #3494E6;
/* fallback for old browsers /
background: -webkit-linear-gradient(to right, #EC6EAD, #3494E6);
/ Chrome 10-25, Safari 5.1-6 /
background: linear-gradient(to right, #EC6EAD, #3494E6);
/ W3C, IE 10+/ Edge, Firefox 16+, Chrome 26+, Opera 12+, Safari 7+ */
margin: 1px;
padding: 1px;
box-sizing: border-box;
}
section {
width: 100%;
display: flex;
justify-content: center;
}
.tarjeta {
position: absolute;
width: 380px;
height: 530px;
background: white;
border-radius: 5%;
overflow: hidden;
top: 5%;
z-index: 1;
border: 5px solid grey;
}
.tarjeta img:nth-child(1) {
position: absolute;
width: 100%;
height: 35%;
z-index: 2;
}
.tarjeta img:nth-child(2) {
position: absolute;
border-radius: 50%;
top: 22.5%;
left: 36.5%;
width: 28%;
height: 22%;
border: 5px solid papayawhip;
z-index: 3;
}
p {
font-family: Arial, Helvetica, sans-serif;
}
.tarjeta p:nth-child(3) {
position: absolute;
z-index: 4;
font-size: 2.5rem;
top: 43.5%;
left: 27%;
text-align: center;
color: dimgray;
}
.tarjeta p:nth-child(4) {
position: absolute;
z-index: 4;
font-size: 1.5rem;
top: 52%;
left: 29.5%;
text-align: center;
color: dimgray;
}
.tarjeta p:nth-child(5) {
position: absolute;
z-index: 5;
font-size: 1.7rem;
top: 63%;
left: 15%;
text-align: center;
color: dimgray;
}
.tarjeta p:nth-child(6) {
position: absolute;
z-index: 6;
font-size: 1.7rem;
top: 63%;
left: 60%;
text-align: center;
color: dimgray;
}
.tarjeta p:nth-child(5)::before {
content: “📌”;
}
.tarjeta p:nth-child(6)::before {
content: “📧”;
}
.block1 {
position: absolute;
z-index: 2;
width: 50%;
height: 14%;
bottom: 10%;
left: 0;
border: 1.8px solid dimgray;
box-sizing: border-box;
}
.block1 p {
position: absolute;
text-align: center;
font-size: 2rem;
color: dimgray;
}
.block1 p:nth-child(1) {
position: absolute;
bottom: 20%;
left: 35%;
color: dimgray;
}
.block1 p:nth-child(2) {
position: absolute;
top: 25%;
left: 50px;
color: dimgray;
}
.block2 {
position: absolute;
z-index: 1;
width: 50%;
height: 14%;
bottom: 10%;
right: 0;
border: 1.8px solid dimgray;
box-sizing: border-box;
}
.block2 p {
text-align: center;
font-size: 2rem;
color: dimgray;
}
.block2 p:nth-child(1) {
position: absolute;
bottom: 20%;
left: 35%;
color: dimgray;
}
.block2 p:nth-child(2) {
position: absolute;
top: 25%;
left: 50px;
color: dimgray;
}
.tarjeta button:nth-child(9) {
position: absolute;
z-index: 8;
width: 100%;
height: 10%;
font-size: 2rem;
bottom: 0;
justify-content: center;
text-align: center;
background: springgreen;
color: white;
border: 0;
}
.tarjeta button:nth-child(9):focus-visible {
outline: none;
}
Aplicando este código es que podemos obtener darle una forma mas amigable a nuestro esqueleto en HTML. Aplicando el codigo css donde configuramos cada imagen para que sea mas redondo, para darle posicionamiento 1 delante de otro. y Dando color, formato, tamaño de letra entre otras cosas. Es como se puede diseñar una página web. En este caso aplicando esta base es como se puede realizar una carta de presentación básica de los datos de cada uno.
Al final nos quedaria algo similar, Claro cada uno agregaria su propia Imagen personal:

Espero con estos códigos, puedan despejar algunas de sus dudas y lograr una igual o mejor carta de presentación!
